API documentation
Image Pig is a REST API running at api.imagepig.com (or at api.imgpig.com for people in a hurry), you just send a JSON HTTP request and get back a JSON response with base64 encoded data containing an image. Alternatively, we can store the generated image for you – this feature is available only in paid plans.
Text prompts (text to image)
Using text prompts, we generate an image based on your text input. There is a positive and a negative prompt that guide AI model what to (and what not to) generate. The only limitation is your imagination.
We offer three endpoints based on different models:
- Default text prompt: fast and simple, producing small images.
- XL text prompt: good balance of speed and quality.
- FLUX text prompt: slower, but it accepts complicated text prompts and is able to produce high quality images. It is quite demanding on our hardware, so we apply a double charge.
# Default text prompt
You just send a HTTP POST request to https://api.imagepig.com/, include your API key in the request header and add JSON payload with your text prompt.
The endpoint generates images using the Realistic Vision V5.1 model (licensed under CreativeML Open RAIL-M), which is based on Stable Diffusion 1.5 (SD1.5) base model. Output image size for SD1.5 models is 512×512 px.
The SD1.5 models are relatively fast – under normal conditions, we generate the response in one or two seconds.
Technical specification
| Endpoint: | / |
|---|---|
| HTTP method: | POST |
| Request headers | |
Content-Type (string, required) |
application/json |
Api-Key (string, required) |
your-api-key |
| Request body attributes | |
positive_prompt or prompt (string) |
Text guiding image generation. Basically, you put here what you want to see on the generated image. |
negative_prompt (string) |
Opposite of positive_prompt. You can specify here what you do not want to see on the generated image. |
language (string) |
ISO 639-1 code of a language. Specify in case the text prompts are in a different language than English. Supported languages:
|
format (string, default: JPEG) |
Output image format. It can be either JPEG or PNG. |
seed (non-negative 64-bit integer, default: random value) |
Seed is a starting point for the random number generator used by model to generate images. Set it if you want to get deterministic results. |
storage_days (non-negative integer, default: 0) |
Return image_url with uploaded file URL (instead of returning image_data). The URL will be valid for several days, depending on the storage_days value, then the file will be removed. When set to 0, this feature is disabled. Available only in paid plans. |
| Response body attributes (success) | |
image_data (string) |
A base64 encoded AI generated image. |
image_url (string) |
In case of sending storage_days, image URL is returned instead of image_data. |
mime_type (string) |
format request attribute. It can be either image/jpeg or image/png. |
seed (non-negative 64-bit integer) |
A seed value used for generating this particular image. |
started_at (string) |
ISO-formatted date and time of when the API started to process the request. |
completed_at (string) |
ISO-formatted date and time of when the API finished with generating the image. |
| Response body attributes (error) | |
error (string) |
An error message explaining what went wrong. |
started_at (string) |
ISO-formatted date and time of when the API started to process the request. |
completed_at (string) |
ISO-formatted date and time of when the API responded with the error message. |
Usage examples
For Python, we provide a convenient imagepig package that you can use to easily access the API.
First, install it using the pip package manager:
pip install imagepigThen, use this package to call the API:
from imagepig import ImagePig

imagepig = ImagePig("your-api-key")
result = imagepig.default("adorable pig")
result.save("adorable-pig.jpeg")
And that is all you need to do. Only one import and three lines of code!
Alternatively, if you prefer to write the code for accessing the API by yourself, you can use the requests library to get our generated image from Image Pig:
from base64 import b64decode
from pathlib import Path

import requests

r = requests.post(
    "https://api.imagepig.com/",
    headers={"Api-Key": "your-api-key"},
    json={"prompt": "adorable pig"},
)

if r.ok:
    with Path("adorable-pig.jpeg").open("wb") as f:
        f.write(b64decode(r.json()["image_data"]))
else:
    r.raise_for_status()
For JavaScript (or TypeScript, if your project allows JavaScript modules) based on Node.js, we provide a convenient imagepig package that you can use to easily access the API.
First, install it using the npm package manager:
npm i imagepigThen, use this package to call the API:
const ImagePig = require('imagepig');

void async function() {
    const imagepig = ImagePig('your-api-key');
    const result = await imagepig.default('adorable pig')
    await result.save('adorable-pig.jpeg');
}();
And that is all you need to do.
Alternatively, if you prefer to write the code for accessing the API by yourself, you can retrieve the generated image using the Fetch API and create a file with Node.js's fs and Buffer modules.
const fs = require('node:fs');
const { Buffer } = require('node:buffer');

void async function() {
    try {
        response = await fetch('https://api.imagepig.com/', {
            method: 'POST',
            headers: {
                'Content-Type': 'application/json',
                'Api-Key': 'your-api-key'
            },
            body: JSON.stringify({"prompt": "adorable pig"})
        });

        if (!response.ok) {
            throw new Error(`Response status: ${response.status}`);
        }

        json = await response.json();
        const buffer = Buffer.from(json.image_data, 'base64');

        fs.writeFile(
            'adorable-pig.jpeg',
            buffer,
            (error) => {
                if (error) {
                    throw error;
                }
            }
        );
    } catch (error) {
        console.error(error);
    }
}();
For PHP, we provide a convenient imagepig package that you can use to easily access the API.
First, install it using the composer dependency manager:
composer require doubleplus/imagepigThen, use this package to call the API:
<?php

$imagepig = ImagePig\ImagePig('your-api-key');
$result = $imagepig->default('adorable pig');
$result->save('adorable-pig.jpeg');
And that is all you need to do. Only the opening tag and three lines of code!
Alternatively, if you prefer to write the code for accessing the API by yourself, you can use the cURL library to get the generated image from Image Pig.
<?php

$ch = curl_init('https://api.imagepig.com/');

curl_setopt($ch, CURLOPT_HTTPHEADER, [
    'Content-Type: application/json',
    'Api-Key: your-api-key',
]);
curl_setopt($ch, CURLOPT_RETURNTRANSFER, true);

curl_setopt($ch, CURLOPT_POST, true);
curl_setopt($ch, CURLOPT_POSTFIELDS, json_encode([
    'prompt' => 'adorable pig',
]));

$response = curl_exec($ch);

if (curl_errno($ch)) {
    exit('Error: ' . curl_error($ch));
}

$handle = fopen('adorable-pig.jpeg', 'wb');
fwrite($handle, base64_decode(json_decode($response, true)['image_data']));
fclose($handle);
For Rust, we provide a convenient imagepig crate that you can use to easily access the API.
First, install it using the cargo package manager:
cargo add imagepigFor this particular example, you will also need to install tokio be able to run asynchronous code inside the main function:
cargo add tokio -F rt-multi-thread -F macrosThen, use the installed imagepig crate to call the API:
use imagepig::ImagePig;

#[tokio::main]
async fn main() -> Result<(), imagepig::ImagePigError> {
    let imagepig = ImagePig::new("your-api-key".to_string(), None);
    let result = imagepig.default("adorable pig", None, None).await.unwrap();
    result.save("adorable-pig.jpeg").await?;

    Ok(())
}
And that is all you need to do.
To implement the API access by yourself, you need to install some dependencies using cargo first:
cargo add base64
cargo add reqwest -F json
cargo add serde -F derive
cargo add tokio -F rt-multi-thread -F macros
Then, you are able to run it using the cargo run command.
use base64::Engine;

#[derive(serde::Deserialize)]
struct ImagePigResponse {
    image_data: String,
}

#[tokio::main]
async fn main() -> Result<(), Box<dyn std::error::Error>> {
    let client = reqwest::Client::new();
    let response = client.post("https://api.imagepig.com/")
        .header("Content-Type", "application/json")
        .header("Api-Key", "your-api-key")
        .body(r#"{"prompt": "adorable pig"}"#)
        .send()
        .await?;

    response.error_for_status_ref()?;

    let json = response.json::<ImagePigResponse>().await?;
    let content = base64::prelude::BASE64_STANDARD.decode(json.image_data)?;

    std::fs::write("adorable-pig.jpeg", content).unwrap();

    Ok(())
}
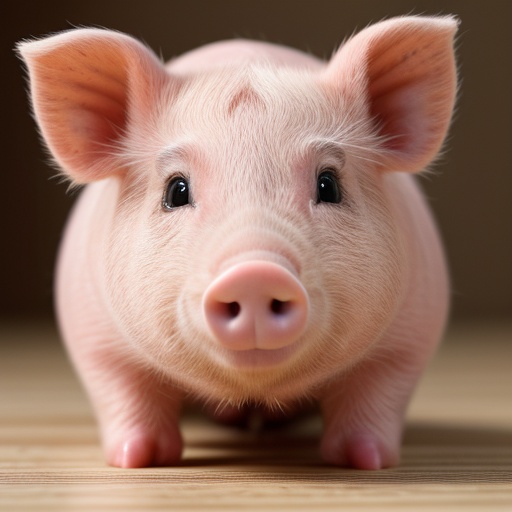
Anyway, the code will write the resulting image a to a file named adorable-pig.jpeg, which looks like this:
Try it out!
You need to have an API key to use this functionality. Create your Image Pig account or log in.
# XL text prompt
XL text prompt is similar to the default text prompt, except that it is send to the https://api.imagepig.com/xl URL.
The endpoint generates images using the RealVisXL V5.0 model (licensed under CreativeML Open RAIL++-M), which is based on Stable Diffusion XL (SDXL) base model. As the name suggests, the output image size of SDXL models is extra large, which means 1024×1024 px.
The SDXL models are little slower than SD1.5 models – under normal conditions, we generate the response within three or four seconds.
Technical specification
| Endpoint: | /xl |
|---|---|
| HTTP method: | POST |
| Request headers | |
Content-Type (string, required) |
application/json |
Api-Key (string, required) |
your-api-key |
| Request body attributes | |
positive_prompt or prompt (string) |
Text guiding image generation. Basically, you put here what you want to see on the generated image. |
negative_prompt (string) |
Opposite of positive_prompt. You can specify here what you do not want to see on the generated image. |
language (string) |
ISO 639-1 code of a language. Specify in case the text prompts are in a different language than English. Supported languages:
|
format (string, default: JPEG) |
Output image format. It can be either JPEG or PNG. |
seed (non-negative 64-bit integer, default: random value) |
Seed is a starting point for the random number generator used by model to generate images. Set it if you want to get deterministic results. |
storage_days (non-negative integer, default: 0) |
Return image_url with uploaded file URL (instead of returning image_data). The URL will be valid for several days, depending on the storage_days value, then the file will be removed. When set to 0, this feature is disabled. Available only in paid plans. |
| Response body attributes (success) | |
image_data (string) |
A base64 encoded AI generated image. |
image_url (string) |
In case of sending storage_days, image URL is returned instead of image_data. |
mime_type (string) |
format request attribute. It can be either image/jpeg or image/png. |
seed (non-negative 64-bit integer) |
A seed value used for generating this particular image. |
started_at (string) |
ISO-formatted date and time of when the API started to process the request. |
completed_at (string) |
ISO-formatted date and time of when the API finished with generating the image. |
| Response body attributes (error) | |
error (string) |
An error message explaining what went wrong. |
started_at (string) |
ISO-formatted date and time of when the API started to process the request. |
completed_at (string) |
ISO-formatted date and time of when the API responded with the error message. |
Usage examples
For Python, we provide a convenient imagepig package that you can use to easily access the API.
First, install it using the pip package manager:
pip install imagepigThen, use this package to call the API:
from imagepig import ImagePig

imagepig = ImagePig("your-api-key")
result = imagepig.xl("sunbathing pig")
result.save("sunbathing-pig.jpeg")
And that is all you need to do. Only one import and three lines of code!
Alternatively, if you prefer to write the code for accessing the API by yourself, you can use the requests library to get our generated image from Image Pig:
from base64 import b64decode
from pathlib import Path

import requests

r = requests.post(
    "https://api.imagepig.com/xl",
    headers={"Api-Key": "your-api-key"},
    json={"prompt": "happy sunbathing pig, resting"},
)

if r.ok:
    with Path("sunbathing-pig.jpeg").open("wb") as f:
        f.write(b64decode(r.json()["image_data"]))
else:
    r.raise_for_status()
For JavaScript (or TypeScript, if your project allows JavaScript modules) based on Node.js, we provide a convenient imagepig package that you can use to easily access the API.
First, install it using the npm package manager:
npm i imagepigThen, use this package to call the API:
const ImagePig = require('imagepig');

void async function() {
    const imagepig = ImagePig('your-api-key');
    const result = await imagepig.xl('sunbathing pig')
    await result.save('sunbathing-pig.jpeg');
}();
And that is all you need to do.
Alternatively, if you prefer to write the code for accessing the API by yourself, you can retrieve the generated image using the Fetch API and create a file with Node.js's fs and Buffer modules.
const fs = require('node:fs');
const { Buffer } = require('node:buffer');

void async function() {
    try {
        response = await fetch('https://api.imagepig.com/xl', {
            method: 'POST',
            headers: {
                'Content-Type': 'application/json',
                'Api-Key': 'your-api-key'
            },
            body: JSON.stringify({"prompt": "happy sunbathing pig, resting"})
        });

        if (!response.ok) {
            throw new Error(`Response status: ${response.status}`);
        }

        json = await response.json();
        const buffer = Buffer.from(json.image_data, 'base64');

        fs.writeFile(
            'sunbathing-pig.jpeg',
            buffer,
            (error) => {
                if (error) {
                    throw error;
                }
            }
        );
    } catch (error) {
        console.error(error);
    }
}();
For PHP, we provide a convenient imagepig package that you can use to easily access the API.
First, install it using the composer dependency manager:
composer require doubleplus/imagepigThen, use this package to call the API:
<?php

$imagepig = ImagePig\ImagePig('your-api-key');
$result = $imagepig->xl('sunbathing pig');
$result->save('sunbathing-pig.jpeg');
And that is all you need to do. Only the opening tag and three lines of code!
Alternatively, if you prefer to write the code for accessing the API by yourself, you can use the cURL library to get the generated image from Image Pig.
<?php

$ch = curl_init('https://api.imagepig.com/xl');

curl_setopt($ch, CURLOPT_HTTPHEADER, [
    'Content-Type: application/json',
    'Api-Key: your-api-key',
]);
curl_setopt($ch, CURLOPT_RETURNTRANSFER, true);

curl_setopt($ch, CURLOPT_POST, true);
curl_setopt($ch, CURLOPT_POSTFIELDS, json_encode([
    'prompt' => 'happy sunbathing pig, resting',
]));

$response = curl_exec($ch);

if (curl_errno($ch)) {
    exit('Error: ' . curl_error($ch));
}

$handle = fopen('sunbathing-pig.jpeg', 'wb');
fwrite($handle, base64_decode(json_decode($response, true)['image_data']));
fclose($handle);
For Rust, we provide a convenient imagepig crate that you can use to easily access the API.
First, install it using the cargo package manager:
cargo add imagepigFor this particular example, you will also need to install tokio be able to run asynchronous code inside the main function:
cargo add tokio -F rt-multi-thread -F macrosThen, use the installed imagepig crate to call the API:
use imagepig::ImagePig;

#[tokio::main]
async fn main() -> Result<(), imagepig::ImagePigError> {
    let imagepig = ImagePig::new("your-api-key".to_string(), None);
    let result = imagepig.xl("sunbathing pig", None, None).await.unwrap();
    result.save("sunbathing-pig.jpeg").await?;

    Ok(())
}
And that is all you need to do.
To implement the API access by yourself, you need to install some dependencies using cargo first:
cargo add base64
cargo add reqwest -F json
cargo add serde -F derive
cargo add tokio -F rt-multi-thread -F macros
Then, you are able to run it using the cargo run command.
use base64::Engine;

#[derive(serde::Deserialize)]
struct ImagePigResponse {
    image_data: String,
}

#[tokio::main]
async fn main() -> Result<(), Box<dyn std::error::Error>> {
    let client = reqwest::Client::new();
    let response = client.post("https://api.imagepig.com/xl")
        .header("Content-Type", "application/json")
        .header("Api-Key", "your-api-key")
        .body(r#"{"prompt": "happy sunbathing pig, resting"}"#)
        .send()
        .await?;

    response.error_for_status_ref()?;

    let json = response.json::<ImagePigResponse>().await?;
    let content = base64::prelude::BASE64_STANDARD.decode(json.image_data)?;

    std::fs::write("sunbathing-pig.jpeg", content).unwrap();

    Ok(())
}
Anyway, the code will write the resulting image a to a file named sunbathing-pig.jpeg, which looks like this:

Try it out!
You need to have an API key to use this functionality. Create your Image Pig account or log in.
# FLUX text prompt
FLUX model is different than stable diffusion models: for example, there is no negative_prompt. The request is send to the https://api.imagepig.com/flux URL.
The endpoint generates images using the FLUX.1 [schnell] model (licensed under Apache License 2.0). We consider this model to be a state-of-the-art technology, as it is able to render very complicated text prompts and even manages to display writing acceptably. It produces reasonably SFW images.
The FLUX model is much slower than stable diffusion models – even under normal conditions, it can take more than five seconds to generate an image.
Output image size of this model is variable and it can be set in the payload. By default, we render images in a landscape mode (i.e. 1216×832 px).
Technical specification
| Endpoint: | /flux |
|---|---|
| HTTP method: | POST |
| Request headers | |
Content-Type (string, required) |
application/json |
Api-Key (string, required) |
your-api-key |
| Request body attributes | |
positive_prompt or prompt (string) |
Text guiding image generation. Basically, you put here what you want to see on the generated image. |
proportion (string, default: landscape) |
The dimension of output image. You can enter one of following values:
|
language (string) |
ISO 639-1 code of a language. Specify in case the text prompts are in a different language than English. Supported languages:
|
format (string, default: JPEG) |
Output image format. It can be either JPEG or PNG. |
seed (non-negative 64-bit integer, default: random value) |
Seed is a starting point for the random number generator used by model to generate images. Set it if you want to get deterministic results. |
storage_days (non-negative integer, default: 0) |
Return image_url with uploaded file URL (instead of returning image_data). The URL will be valid for several days, depending on the storage_days value, then the file will be removed. When set to 0, this feature is disabled. Available only in paid plans. |
| Response body attributes (success) | |
image_data (string) |
A base64 encoded AI generated image. |
image_url (string) |
In case of sending storage_days, image URL is returned instead of image_data. |
mime_type (string) |
format request attribute. It can be either image/jpeg or image/png. |
seed (non-negative 64-bit integer) |
A seed value used for generating this particular image. |
started_at (string) |
ISO-formatted date and time of when the API started to process the request. |
completed_at (string) |
ISO-formatted date and time of when the API finished with generating the image. |
| Response body attributes (error) | |
error (string) |
An error message explaining what went wrong. |
started_at (string) |
ISO-formatted date and time of when the API started to process the request. |
completed_at (string) |
ISO-formatted date and time of when the API responded with the error message. |
Usage examples
For Python, we provide a convenient imagepig package that you can use to easily access the API.
First, install it using the pip package manager:
pip install imagepigThen, use this package to call the API:
from imagepig import ImagePig

imagepig = ImagePig("your-api-key")
result = imagepig.flux("space captain pig")
result.save("space-captain-pig.jpeg")
And that is all you need to do. Only one import and three lines of code!
Alternatively, if you prefer to write the code for accessing the API by yourself, you can use the requests library to get our generated image from Image Pig:
from base64 import b64decode
from pathlib import Path

import requests

r = requests.post(
    "https://api.imagepig.com/flux",
    headers={"Api-Key": "your-api-key"},
    json={"prompt": "a pig as a pilot of a cosmic ship, floating in a space"},
)

if r.ok:
    with Path("space-captain-pig.jpeg").open("wb") as f:
        f.write(b64decode(r.json()["image_data"]))
else:
    r.raise_for_status()
For JavaScript (or TypeScript, if your project allows JavaScript modules) based on Node.js, we provide a convenient imagepig package that you can use to easily access the API.
First, install it using the npm package manager:
npm i imagepigThen, use this package to call the API:
const ImagePig = require('imagepig');

void async function() {
    const imagepig = ImagePig('your-api-key');
    const result = await imagepig.flux('space captain pig')
    await result.save('space-captain-pig.jpeg');
}();
And that is all you need to do.
Alternatively, if you prefer to write the code for accessing the API by yourself, you can retrieve the generated image using the Fetch API and create a file with Node.js's fs and Buffer modules.
const fs = require('node:fs');
const { Buffer } = require('node:buffer');

void async function() {
    try {
        response = await fetch('https://api.imagepig.com/flux', {
            method: 'POST',
            headers: {
                'Content-Type': 'application/json',
                'Api-Key': 'your-api-key'
            },
            body: JSON.stringify({"prompt": "a pig as a pilot of a cosmic ship, floating in a space"})
        });

        if (!response.ok) {
            throw new Error(`Response status: ${response.status}`);
        }

        json = await response.json();
        const buffer = Buffer.from(json.image_data, 'base64');

        fs.writeFile(
            'space-captain-pig.jpeg',
            buffer,
            (error) => {
                if (error) {
                    throw error;
                }
            }
        );
    } catch (error) {
        console.error(error);
    }
}();
For PHP, we provide a convenient imagepig package that you can use to easily access the API.
First, install it using the composer dependency manager:
composer require doubleplus/imagepigThen, use this package to call the API:
<?php

$imagepig = ImagePig\ImagePig('your-api-key');
$result = $imagepig->flux('space captain pig');
$result->save('space-captain-pig.jpeg');
And that is all you need to do. Only the opening tag and three lines of code!
Alternatively, if you prefer to write the code for accessing the API by yourself, you can use the cURL library to get the generated image from Image Pig.
<?php

$ch = curl_init('https://api.imagepig.com/flux');

curl_setopt($ch, CURLOPT_HTTPHEADER, [
    'Content-Type: application/json',
    'Api-Key: your-api-key',
]);
curl_setopt($ch, CURLOPT_RETURNTRANSFER, true);

curl_setopt($ch, CURLOPT_POST, true);
curl_setopt($ch, CURLOPT_POSTFIELDS, json_encode([
    'prompt' => 'a pig as a pilot of a cosmic ship, floating in a space',
]));

$response = curl_exec($ch);

if (curl_errno($ch)) {
    exit('Error: ' . curl_error($ch));
}

$handle = fopen('space-captain-pig.jpeg', 'wb');
fwrite($handle, base64_decode(json_decode($response, true)['image_data']));
fclose($handle);
For Rust, we provide a convenient imagepig crate that you can use to easily access the API.
First, install it using the cargo package manager:
cargo add imagepigFor this particular example, you will also need to install tokio be able to run asynchronous code inside the main function:
cargo add tokio -F rt-multi-thread -F macrosThen, use the installed imagepig crate to call the API:
use imagepig::ImagePig;

#[tokio::main]
async fn main() -> Result<(), imagepig::ImagePigError> {
    let imagepig = ImagePig::new("your-api-key".to_string(), None);
    let result = imagepig.flux("space captain pig", None, None).await.unwrap();
    result.save("space-captain-pig.jpeg").await?;

    Ok(())
}
And that is all you need to do.
To implement the API access by yourself, you need to install some dependencies using cargo first:
cargo add base64
cargo add reqwest -F json
cargo add serde -F derive
cargo add tokio -F rt-multi-thread -F macros
Then, you are able to run it using the cargo run command.
use base64::Engine;

#[derive(serde::Deserialize)]
struct ImagePigResponse {
    image_data: String,
}

#[tokio::main]
async fn main() -> Result<(), Box<dyn std::error::Error>> {
    let client = reqwest::Client::new();
    let response = client.post("https://api.imagepig.com/flux")
        .header("Content-Type", "application/json")
        .header("Api-Key", "your-api-key")
        .body(r#"{"prompt": "a pig as a pilot of a cosmic ship, floating in a space"}"#)
        .send()
        .await?;

    response.error_for_status_ref()?;

    let json = response.json::<ImagePigResponse>().await?;
    let content = base64::prelude::BASE64_STANDARD.decode(json.image_data)?;

    std::fs::write("space-captain-pig.jpeg", content).unwrap();

    Ok(())
}
Anyway, the code will write the resulting image a to a file named space-captain-pig.jpeg, which looks like this:

Try it out!
You need to have an API key to use this functionality. Create your Image Pig account or log in.
Image manipulation (image to image)
Various handy tools for modification of image content.
- Face swapping: replace a face from a target image with a face from a source image.
- Background removal: extract main object from its background.
- Upscaling: increase size of your image using the AI upscaler.
- Outpainting: extend an image to one or multiple sides.
# Face swapping
It extracts a face from a source image and uses it for replacing a face in a target image. It performs the face swap only once, trying to find the largest face on the target image. In case any face could not be detected, the endpoint responds with HTTP status code 422 (Unprocessable Content).
Face detection and swap is done using InsightFace (MIT License) and the result is enhanced by GFPGAN (Apache License 2.0).
This endpoint is very fast, we usually perform face swapping under one second.
Technical specification
| Endpoint: | /faceswap |
|---|---|
| HTTP method: | POST |
| Request headers | |
Content-Type (string, required) |
application/json |
Api-Key (string, required) |
your-api-key |
| Request body attributes | |
source_image_url (string) |
URL (starting with http:// or https://) pointing to the source input image, from which a face is extracted. HTTP status code 422 (Unprocessable Content) is returned if no face is detected. To improve performance, the image will be downscaled to 1024 px. |
source_image_data (string) |
The same as source_image_url, but instead of URL, a base64 encoded image content is provided. And it is faster, because it does not need to download anything. |
target_image_url (string) |
URL (starting with http:// or https://) pointing to the target input image, in which a face is swapped with the face from the source image. HTTP status code 422 (Unprocessable Content) is returned if no face is detected. To improve performance, the image will be downscaled to 1024 px. |
target_image_data (string) |
The same as target_image_url, but instead of URL, a base64 encoded image content is provided. And it is faster, because it does not need to download anything. |
format (string, default: JPEG) |
Output image format. It can be either JPEG or PNG. |
storage_days (non-negative integer, default: 0) |
Return image_url with uploaded file URL (instead of returning image_data). The URL will be valid for several days, depending on the storage_days value, then the file will be removed. When set to 0, this feature is disabled. Available only in paid plans. |
| Response body attributes (success) | |
image_data (string) |
A base64 encoded AI generated image. |
image_url (string) |
In case of sending storage_days, image URL is returned instead of image_data. |
mime_type (string) |
format request attribute. It can be either image/jpeg or image/png. |
started_at (string) |
ISO-formatted date and time of when the API started to process the request. |
completed_at (string) |
ISO-formatted date and time of when the API finished with generating the image. |
| Response body attributes (error) | |
error (string) |
An error message explaining what went wrong. |
started_at (string) |
ISO-formatted date and time of when the API started to process the request. |
completed_at (string) |
ISO-formatted date and time of when the API responded with the error message. |
Usage examples
A sample source image is stored at https://imagepig.com/static/jane.jpeg and it looks like that:

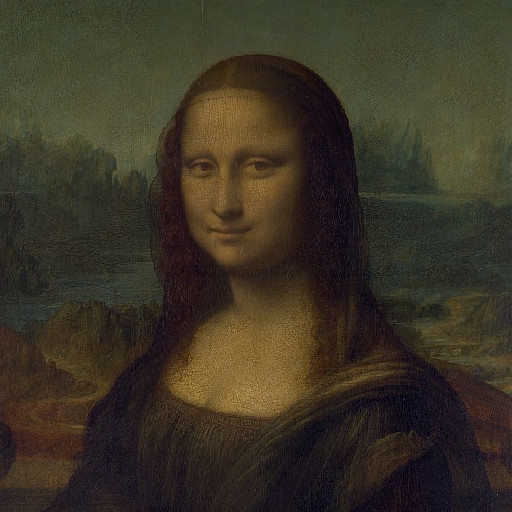
A sample target image is stored at https://imagepig.com/static/mona-lisa.jpeg and it is none other than the famous painting of Mona Lisa by Leonardo da Vinci:
So let us swap faces of Mona and Jane!
For Python, we provide a convenient imagepig package that you can use to easily access the API.
First, install it using the pip package manager:
pip install imagepigThen, use this package to call the API:
from imagepig import ImagePig

imagepig = ImagePig("your-api-key")
result = imagepig.faceswap("https://imagepig.com/static/jane.jpeg", "https://imagepig.com/static/mona-lisa.jpeg")
result.save("jane-lisa.jpeg")
And that is all you need to do. Only one import and three lines of code!
Alternatively, if you prefer to write the code for accessing the API by yourself, you can use the requests library to get our generated image from Image Pig:
from base64 import b64decode
from pathlib import Path

import requests

r = requests.post(
    "https://api.imagepig.com/faceswap",
    headers={"Api-Key": "your-api-key"},
    json={"source_image_url": "https://imagepig.com/static/jane.jpeg", "target_image_url": "https://imagepig.com/static/mona-lisa.jpeg"},
)

if r.ok:
    with Path("jane-lisa.jpeg").open("wb") as f:
        f.write(b64decode(r.json()["image_data"]))
else:
    r.raise_for_status()
For JavaScript (or TypeScript, if your project allows JavaScript modules) based on Node.js, we provide a convenient imagepig package that you can use to easily access the API.
First, install it using the npm package manager:
npm i imagepigThen, use this package to call the API:
const ImagePig = require('imagepig');

void async function() {
    const imagepig = ImagePig('your-api-key');
    const result = await imagepig.faceswap('https://imagepig.com/static/jane.jpeg', 'https://imagepig.com/static/mona-lisa.jpeg')
    await result.save('jane-lisa.jpeg');
}();
And that is all you need to do.
Alternatively, if you prefer to write the code for accessing the API by yourself, you can retrieve the generated image using the Fetch API and create a file with Node.js's fs and Buffer modules.
const fs = require('node:fs');
const { Buffer } = require('node:buffer');

void async function() {
    try {
        response = await fetch('https://api.imagepig.com/faceswap', {
            method: 'POST',
            headers: {
                'Content-Type': 'application/json',
                'Api-Key': 'your-api-key'
            },
            body: JSON.stringify({"source_image_url": "https://imagepig.com/static/jane.jpeg", "target_image_url": "https://imagepig.com/static/mona-lisa.jpeg"})
        });

        if (!response.ok) {
            throw new Error(`Response status: ${response.status}`);
        }

        json = await response.json();
        const buffer = Buffer.from(json.image_data, 'base64');

        fs.writeFile(
            'jane-lisa.jpeg',
            buffer,
            (error) => {
                if (error) {
                    throw error;
                }
            }
        );
    } catch (error) {
        console.error(error);
    }
}();
For PHP, we provide a convenient imagepig package that you can use to easily access the API.
First, install it using the composer dependency manager:
composer require doubleplus/imagepigThen, use this package to call the API:
<?php

$imagepig = ImagePig\ImagePig('your-api-key');
$result = $imagepig->faceswap('https://imagepig.com/static/jane.jpeg', 'https://imagepig.com/static/mona-lisa.jpeg');
$result->save('jane-lisa.jpeg');
And that is all you need to do. Only the opening tag and three lines of code!
Alternatively, if you prefer to write the code for accessing the API by yourself, you can use the cURL library to get the generated image from Image Pig.
<?php

$ch = curl_init('https://api.imagepig.com/faceswap');

curl_setopt($ch, CURLOPT_HTTPHEADER, [
    'Content-Type: application/json',
    'Api-Key: your-api-key',
]);
curl_setopt($ch, CURLOPT_RETURNTRANSFER, true);

curl_setopt($ch, CURLOPT_POST, true);
curl_setopt($ch, CURLOPT_POSTFIELDS, json_encode([
    'source_image_url' => 'https://imagepig.com/static/jane.jpeg',
    'target_image_url' => 'https://imagepig.com/static/mona-lisa.jpeg',
]));

$response = curl_exec($ch);

if (curl_errno($ch)) {
    exit('Error: ' . curl_error($ch));
}

$handle = fopen('jane-lisa.jpeg', 'wb');
fwrite($handle, base64_decode(json_decode($response, true)['image_data']));
fclose($handle);
For Rust, we provide a convenient imagepig crate that you can use to easily access the API.
First, install it using the cargo package manager:
cargo add imagepigFor this particular example, you will also need to install tokio be able to run asynchronous code inside the main function:
cargo add tokio -F rt-multi-thread -F macrosThen, use the installed imagepig crate to call the API:
use imagepig::ImagePig;

#[tokio::main]
async fn main() -> Result<(), imagepig::ImagePigError> {
    let imagepig = ImagePig::new("your-api-key".to_string(), None);
    let result = imagepig.faceswap("https://imagepig.com/static/jane.jpeg", "https://imagepig.com/static/mona-lisa.jpeg", None).await.unwrap();
    result.save("jane-lisa.jpeg").await?;

    Ok(())
}
And that is all you need to do.
To implement the API access by yourself, you need to install some dependencies using cargo first:
cargo add base64
cargo add reqwest -F json
cargo add serde -F derive
cargo add tokio -F rt-multi-thread -F macros
Then, you are able to run it using the cargo run command.
use base64::Engine;

#[derive(serde::Deserialize)]
struct ImagePigResponse {
    image_data: String,
}

#[tokio::main]
async fn main() -> Result<(), Box<dyn std::error::Error>> {
    let client = reqwest::Client::new();
    let response = client.post("https://api.imagepig.com/faceswap")
        .header("Content-Type", "application/json")
        .header("Api-Key", "your-api-key")
        .body(r#"{"source_image_url": "https://imagepig.com/static/jane.jpeg", "target_image_url": "https://imagepig.com/static/mona-lisa.jpeg"}"#)
        .send()
        .await?;

    response.error_for_status_ref()?;

    let json = response.json::<ImagePigResponse>().await?;
    let content = base64::prelude::BASE64_STANDARD.decode(json.image_data)?;

    std::fs::write("jane-lisa.jpeg", content).unwrap();

    Ok(())
}
Anyway, the code will write the resulting image a to a file named jane-lisa.jpeg, which looks like this:

Try it out!
You need to have an API key to use this functionality. Create your Image Pig account or log in.
# Background removal
Using the U²-Net model (licensed under Apache License 2.0), this endpoint takes an image and creates a cutout, i.e. background removal. It outputs a PNG file with a transparent background.
Usually, it takes around one second to remove background.
Technical specification
| Endpoint: | /cutout |
|---|---|
| HTTP method: | POST |
| Request headers | |
Content-Type (string, required) |
application/json |
Api-Key (string, required) |
your-api-key |
| Request body attributes | |
image_url (string) |
URL (starting with http:// or https://) pointing to the input image, which should be processed by the endpoint. |
image_data (string) |
The same as image_url, but instead of URL, a base64 encoded image content is provided. And it is faster, because it does not need to download anything. |
seed (non-negative 64-bit integer, default: random value) |
Seed is a starting point for the random number generator used by model to generate images. Set it if you want to get deterministic results. |
storage_days (non-negative integer, default: 0) |
Return image_url with uploaded file URL (instead of returning image_data). The URL will be valid for several days, depending on the storage_days value, then the file will be removed. When set to 0, this feature is disabled. Available only in paid plans. |
| Response body attributes (success) | |
image_data (string) |
A base64 encoded AI generated image. |
image_url (string) |
In case of sending storage_days, image URL is returned instead of image_data. |
mime_type (string) |
format request attribute. It can be either image/jpeg or image/png. |
seed (non-negative 64-bit integer) |
A seed value used for generating this particular image. |
started_at (string) |
ISO-formatted date and time of when the API started to process the request. |
completed_at (string) |
ISO-formatted date and time of when the API finished with generating the image. |
| Response body attributes (error) | |
error (string) |
An error message explaining what went wrong. |
started_at (string) |
ISO-formatted date and time of when the API started to process the request. |
completed_at (string) |
ISO-formatted date and time of when the API responded with the error message. |
Usage examples
A sample image is stored at https://imagepig.com/static/street.jpeg and it looks like that:

Now we remove its background.
For Python, we provide a convenient imagepig package that you can use to easily access the API.
First, install it using the pip package manager:
pip install imagepigThen, use this package to call the API:
from imagepig import ImagePig

imagepig = ImagePig("your-api-key")
result = imagepig.cutout("https://imagepig.com/static/street.jpeg")
result.save("cutout.png")
And that is all you need to do. Only one import and three lines of code!
Alternatively, if you prefer to write the code for accessing the API by yourself, you can use the requests library to get our generated image from Image Pig:
from base64 import b64decode
from pathlib import Path

import requests

r = requests.post(
    "https://api.imagepig.com/cutout",
    headers={"Api-Key": "your-api-key"},
    json={"image_url": "https://imagepig.com/static/street.jpeg"},
)

if r.ok:
    with Path("cutout.png").open("wb") as f:
        f.write(b64decode(r.json()["image_data"]))
else:
    r.raise_for_status()
For JavaScript (or TypeScript, if your project allows JavaScript modules) based on Node.js, we provide a convenient imagepig package that you can use to easily access the API.
First, install it using the npm package manager:
npm i imagepigThen, use this package to call the API:
const ImagePig = require('imagepig');

void async function() {
    const imagepig = ImagePig('your-api-key');
    const result = await imagepig.cutout('https://imagepig.com/static/street.jpeg')
    await result.save('cutout.png');
}();
And that is all you need to do.
Alternatively, if you prefer to write the code for accessing the API by yourself, you can retrieve the generated image using the Fetch API and create a file with Node.js's fs and Buffer modules.
const fs = require('node:fs');
const { Buffer } = require('node:buffer');

void async function() {
    try {
        response = await fetch('https://api.imagepig.com/cutout', {
            method: 'POST',
            headers: {
                'Content-Type': 'application/json',
                'Api-Key': 'your-api-key'
            },
            body: JSON.stringify({"image_url": "https://imagepig.com/static/street.jpeg"})
        });

        if (!response.ok) {
            throw new Error(`Response status: ${response.status}`);
        }

        json = await response.json();
        const buffer = Buffer.from(json.image_data, 'base64');

        fs.writeFile(
            'cutout.png',
            buffer,
            (error) => {
                if (error) {
                    throw error;
                }
            }
        );
    } catch (error) {
        console.error(error);
    }
}();
For PHP, we provide a convenient imagepig package that you can use to easily access the API.
First, install it using the composer dependency manager:
composer require doubleplus/imagepigThen, use this package to call the API:
<?php

$imagepig = ImagePig\ImagePig('your-api-key');
$result = $imagepig->cutout('https://imagepig.com/static/street.jpeg');
$result->save('cutout.png');
And that is all you need to do. Only the opening tag and three lines of code!
Alternatively, if you prefer to write the code for accessing the API by yourself, you can use the cURL library to get the generated image from Image Pig.
<?php

$ch = curl_init('https://api.imagepig.com/cutout');

curl_setopt($ch, CURLOPT_HTTPHEADER, [
    'Content-Type: application/json',
    'Api-Key: your-api-key',
]);
curl_setopt($ch, CURLOPT_RETURNTRANSFER, true);

curl_setopt($ch, CURLOPT_POST, true);
curl_setopt($ch, CURLOPT_POSTFIELDS, json_encode([
    'image_url' => 'https://imagepig.com/static/street.jpeg',
]));

$response = curl_exec($ch);

if (curl_errno($ch)) {
    exit('Error: ' . curl_error($ch));
}

$handle = fopen('cutout.png', 'wb');
fwrite($handle, base64_decode(json_decode($response, true)['image_data']));
fclose($handle);
For Rust, we provide a convenient imagepig crate that you can use to easily access the API.
First, install it using the cargo package manager:
cargo add imagepigFor this particular example, you will also need to install tokio be able to run asynchronous code inside the main function:
cargo add tokio -F rt-multi-thread -F macrosThen, use the installed imagepig crate to call the API:
use imagepig::ImagePig;

#[tokio::main]
async fn main() -> Result<(), imagepig::ImagePigError> {
    let imagepig = ImagePig::new("your-api-key".to_string(), None);
    let result = imagepig.cutout("https://imagepig.com/static/street.jpeg", None).await.unwrap();
    result.save("cutout.png").await?;

    Ok(())
}
And that is all you need to do.
To implement the API access by yourself, you need to install some dependencies using cargo first:
cargo add base64
cargo add reqwest -F json
cargo add serde -F derive
cargo add tokio -F rt-multi-thread -F macros
Then, you are able to run it using the cargo run command.
use base64::Engine;

#[derive(serde::Deserialize)]
struct ImagePigResponse {
    image_data: String,
}

#[tokio::main]
async fn main() -> Result<(), Box<dyn std::error::Error>> {
    let client = reqwest::Client::new();
    let response = client.post("https://api.imagepig.com/cutout")
        .header("Content-Type", "application/json")
        .header("Api-Key", "your-api-key")
        .body(r#"{"image_url": "https://imagepig.com/static/street.jpeg"}"#)
        .send()
        .await?;

    response.error_for_status_ref()?;

    let json = response.json::<ImagePigResponse>().await?;
    let content = base64::prelude::BASE64_STANDARD.decode(json.image_data)?;

    std::fs::write("cutout.png", content).unwrap();

    Ok(())
}
Anyway, the code will write the resulting image a to a file named cutout.png, which looks like this:
Here it is, background removal with no sweat.
Try it out!
You need to have an API key to use this functionality. Create your Image Pig account or log in.
# Upscaling
Increase resolution of an image using the versatile Real-ESRGAN model, originally licensed under BSD 3-Clause License. In many cases, it works better than traditional upscaling algorithms.
It is possible to resize your image 2×, 4× or 8×. The output image size can be up to 8096×8096 px.
The performance of this endpoint depends on the input size of the image. Normally, it takes a second or two, but in the most extreme cases, it can take up to 10 seconds.
Technical specification
| Endpoint: | /upscale |
|---|---|
| HTTP method: | POST |
| Request headers | |
Content-Type (string, required) |
application/json |
Api-Key (string, required) |
your-api-key |
| Request body attributes | |
image_url (string) |
URL (starting with http:// or https://) pointing to the input image, which should be processed by the endpoint. |
image_data (string) |
The same as image_url, but instead of URL, a base64 encoded image content is provided. And it is faster, because it does not need to download anything. |
upscaling_factor (integer, one of [2, 4, 8], default: 2) |
How many times should the image be upscaled. For example, with upscaling factor 4 and input image of 512×512 px, the resulting image size is 2048×2048 px. Maximum output image size is 8096×8096 px. |
format (string, default: JPEG) |
Output image format. It can be either JPEG or PNG. |
seed (non-negative 64-bit integer, default: random value) |
Seed is a starting point for the random number generator used by model to generate images. Set it if you want to get deterministic results. |
storage_days (non-negative integer, default: 0) |
Return image_url with uploaded file URL (instead of returning image_data). The URL will be valid for several days, depending on the storage_days value, then the file will be removed. When set to 0, this feature is disabled. Available only in paid plans. |
| Response body attributes (success) | |
image_data (string) |
A base64 encoded AI generated image. |
image_url (string) |
In case of sending storage_days, image URL is returned instead of image_data. |
mime_type (string) |
format request attribute. It can be either image/jpeg or image/png. |
seed (non-negative 64-bit integer) |
A seed value used for generating this particular image. |
started_at (string) |
ISO-formatted date and time of when the API started to process the request. |
completed_at (string) |
ISO-formatted date and time of when the API finished with generating the image. |
| Response body attributes (error) | |
error (string) |
An error message explaining what went wrong. |
started_at (string) |
ISO-formatted date and time of when the API started to process the request. |
completed_at (string) |
ISO-formatted date and time of when the API responded with the error message. |
Usage examples
A sample low resolution image is stored at https://imagepig.com/static/jane-lowres.jpeg and it looks like that:

That is pretty bad, right? Let us improve it then!
For Python, we provide a convenient imagepig package that you can use to easily access the API.
First, install it using the pip package manager:
pip install imagepigThen, use this package to call the API:
from imagepig import ImagePig

imagepig = ImagePig("your-api-key")
result = imagepig.upscale("https://imagepig.com/static/jane-lowres.jpeg")
result.save("jane-upscaled.jpeg")
And that is all you need to do. Only one import and three lines of code!
Alternatively, if you prefer to write the code for accessing the API by yourself, you can use the requests library to get our generated image from Image Pig:
from base64 import b64decode
from pathlib import Path

import requests

r = requests.post(
    "https://api.imagepig.com/upscale",
    headers={"Api-Key": "your-api-key"},
    json={"image_url": "https://imagepig.com/static/jane-lowres.jpeg"},
)

if r.ok:
    with Path("jane-upscaled.jpeg").open("wb") as f:
        f.write(b64decode(r.json()["image_data"]))
else:
    r.raise_for_status()
For JavaScript (or TypeScript, if your project allows JavaScript modules) based on Node.js, we provide a convenient imagepig package that you can use to easily access the API.
First, install it using the npm package manager:
npm i imagepigThen, use this package to call the API:
const ImagePig = require('imagepig');

void async function() {
    const imagepig = ImagePig('your-api-key');
    const result = await imagepig.upscale('https://imagepig.com/static/jane-lowres.jpeg')
    await result.save('jane-upscaled.jpeg');
}();
And that is all you need to do.
Alternatively, if you prefer to write the code for accessing the API by yourself, you can retrieve the generated image using the Fetch API and create a file with Node.js's fs and Buffer modules.
const fs = require('node:fs');
const { Buffer } = require('node:buffer');

void async function() {
    try {
        response = await fetch('https://api.imagepig.com/upscale', {
            method: 'POST',
            headers: {
                'Content-Type': 'application/json',
                'Api-Key': 'your-api-key'
            },
            body: JSON.stringify({"image_url": "https://imagepig.com/static/jane-lowres.jpeg"})
        });

        if (!response.ok) {
            throw new Error(`Response status: ${response.status}`);
        }

        json = await response.json();
        const buffer = Buffer.from(json.image_data, 'base64');

        fs.writeFile(
            'jane-upscaled.jpeg',
            buffer,
            (error) => {
                if (error) {
                    throw error;
                }
            }
        );
    } catch (error) {
        console.error(error);
    }
}();
For PHP, we provide a convenient imagepig package that you can use to easily access the API.
First, install it using the composer dependency manager:
composer require doubleplus/imagepigThen, use this package to call the API:
<?php

$imagepig = ImagePig\ImagePig('your-api-key');
$result = $imagepig->upscale('https://imagepig.com/static/jane-lowres.jpeg');
$result->save('jane-upscaled.jpeg');
And that is all you need to do. Only the opening tag and three lines of code!
Alternatively, if you prefer to write the code for accessing the API by yourself, you can use the cURL library to get the generated image from Image Pig.
<?php

$ch = curl_init('https://api.imagepig.com/upscale');

curl_setopt($ch, CURLOPT_HTTPHEADER, [
    'Content-Type: application/json',
    'Api-Key: your-api-key',
]);
curl_setopt($ch, CURLOPT_RETURNTRANSFER, true);

curl_setopt($ch, CURLOPT_POST, true);
curl_setopt($ch, CURLOPT_POSTFIELDS, json_encode([
    'image_url' => 'https://imagepig.com/static/jane-lowres.jpeg',
]));

$response = curl_exec($ch);

if (curl_errno($ch)) {
    exit('Error: ' . curl_error($ch));
}

$handle = fopen('jane-upscaled.jpeg', 'wb');
fwrite($handle, base64_decode(json_decode($response, true)['image_data']));
fclose($handle);
For Rust, we provide a convenient imagepig crate that you can use to easily access the API.
First, install it using the cargo package manager:
cargo add imagepigFor this particular example, you will also need to install tokio be able to run asynchronous code inside the main function:
cargo add tokio -F rt-multi-thread -F macrosThen, use the installed imagepig crate to call the API:
use imagepig::ImagePig;

#[tokio::main]
async fn main() -> Result<(), imagepig::ImagePigError> {
    let imagepig = ImagePig::new("your-api-key".to_string(), None);
    let result = imagepig.upscale("https://imagepig.com/static/jane-lowres.jpeg", None, None).await.unwrap();
    result.save("jane-upscaled.jpeg").await?;

    Ok(())
}
And that is all you need to do.
To implement the API access by yourself, you need to install some dependencies using cargo first:
cargo add base64
cargo add reqwest -F json
cargo add serde -F derive
cargo add tokio -F rt-multi-thread -F macros
Then, you are able to run it using the cargo run command.
use base64::Engine;

#[derive(serde::Deserialize)]
struct ImagePigResponse {
    image_data: String,
}

#[tokio::main]
async fn main() -> Result<(), Box<dyn std::error::Error>> {
    let client = reqwest::Client::new();
    let response = client.post("https://api.imagepig.com/upscale")
        .header("Content-Type", "application/json")
        .header("Api-Key", "your-api-key")
        .body(r#"{"image_url": "https://imagepig.com/static/jane-lowres.jpeg"}"#)
        .send()
        .await?;

    response.error_for_status_ref()?;

    let json = response.json::<ImagePigResponse>().await?;
    let content = base64::prelude::BASE64_STANDARD.decode(json.image_data)?;

    std::fs::write("jane-upscaled.jpeg", content).unwrap();

    Ok(())
}
Anyway, the code will write the resulting image a to a file named jane-upscaled.jpeg, which looks like this:

You would probably agree that the result looks much better than the low resolution original image.
Try it out!
You need to have an API key to use this functionality. Create your Image Pig account or log in.
# Outpainting
This endpoint takes an image and extends it to a specified side (or multiple sides) using the Realistic Vision V5.1 model (licensed under CreativeML Open RAIL-M) according to a text prompt. It is useful in a situation where your image is cut too soon and you would like to generate the missing part.
The outpainting functionality is moderately fast – normally, we generate the response in less than three seconds. But the exact speed depends on the input image size.
Technical specification
| Endpoint: | /outpaint |
|---|---|
| HTTP method: | POST |
| Request headers | |
Content-Type (string, required) |
application/json |
Api-Key (string, required) |
your-api-key |
| Request body attributes | |
image_url (string) |
URL (starting with http:// or https://) pointing to the input image, which should be processed by the endpoint. To improve performance, the image will be downscaled to 1024 px. |
image_data (string) |
The same as image_url, but instead of URL, a base64 encoded image content is provided. And it is faster, because it does not need to download anything. |
positive_prompt or prompt (string) |
Text guiding image generation. Basically, you put here what you want to see on the generated image. |
negative_prompt (string) |
Opposite of positive_prompt. You can specify here what you do not want to see on the generated image. |
language (string) |
ISO 639-1 code of a language. Specify in case the text prompts are in a different language than English. Supported languages:
|
top (non-negative integer up to 1024, default: 0) |
How many pixels should be add to the top side of the image. |
right (non-negative integer up to 1024, default: 0) |
How many pixels should be add to the right side of the image. |
bottom (non-negative integer up to 1024, default: 0) |
How many pixels should be add to the bottom side of the image. |
left (non-negative integer up to 1024, default: 0) |
How many pixels should be add to the left side of the image. |
format (string, default: JPEG) |
Output image format. It can be either JPEG or PNG. |
seed (non-negative 64-bit integer, default: random value) |
Seed is a starting point for the random number generator used by model to generate images. Set it if you want to get deterministic results. |
storage_days (non-negative integer, default: 0) |
Return image_url with uploaded file URL (instead of returning image_data). The URL will be valid for several days, depending on the storage_days value, then the file will be removed. When set to 0, this feature is disabled. Available only in paid plans. |
| Response body attributes (success) | |
image_data (string) |
A base64 encoded AI generated image. |
image_url (string) |
In case of sending storage_days, image URL is returned instead of image_data. |
mime_type (string) |
format request attribute. It can be either image/jpeg or image/png. |
seed (non-negative 64-bit integer) |
A seed value used for generating this particular image. |
started_at (string) |
ISO-formatted date and time of when the API started to process the request. |
completed_at (string) |
ISO-formatted date and time of when the API finished with generating the image. |
| Response body attributes (error) | |
error (string) |
An error message explaining what went wrong. |
started_at (string) |
ISO-formatted date and time of when the API started to process the request. |
completed_at (string) |
ISO-formatted date and time of when the API responded with the error message. |
Usage examples
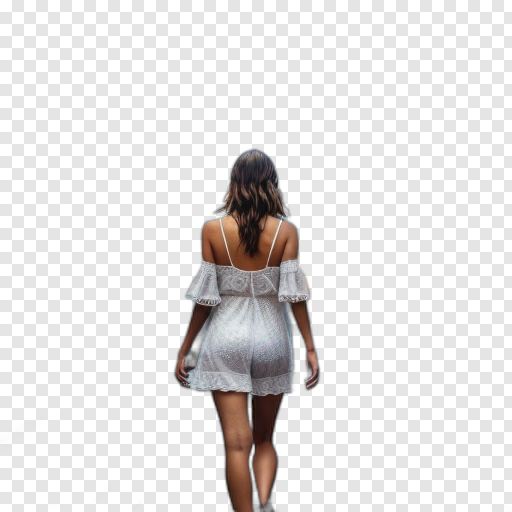
A sample image is stored at https://imagepig.com/static/jane.jpeg and it looks like that:
We would like to extend it to a portrait mode. We specify in the prompt that she will be wearing a dress.
Notice that in our libraries, side order convention is clockwise (i.e. top, right, bottom, left).
For Python, we provide a convenient imagepig package that you can use to easily access the API.
First, install it using the pip package manager:
pip install imagepigThen, use this package to call the API:
from imagepig import ImagePig

imagepig = ImagePig("your-api-key")
result = imagepig.outpaint("https://imagepig.com/static/jane.jpeg", 0, 0, 500)
result.save("jane-in-a-dress.jpeg")
And that is all you need to do. Only one import and three lines of code!
Alternatively, if you prefer to write the code for accessing the API by yourself, you can use the requests library to get our generated image from Image Pig:
from base64 import b64decode
from pathlib import Path

import requests

r = requests.post(
    "https://api.imagepig.com/outpaint",
    headers={"Api-Key": "your-api-key"},
    json={"image_url": "https://imagepig.com/static/jane.jpeg", "prompt": "dress", "bottom": 500},
)

if r.ok:
    with Path("jane-in-a-dress.jpeg").open("wb") as f:
        f.write(b64decode(r.json()["image_data"]))
else:
    r.raise_for_status()
For JavaScript (or TypeScript, if your project allows JavaScript modules) based on Node.js, we provide a convenient imagepig package that you can use to easily access the API.
First, install it using the npm package manager:
npm i imagepigThen, use this package to call the API:
const ImagePig = require('imagepig');

void async function() {
    const imagepig = ImagePig('your-api-key');
    const result = await imagepig.outpaint('https://imagepig.com/static/jane.jpeg', 0, 0, 500)
    await result.save('jane-in-a-dress.jpeg');
}();
And that is all you need to do.
Alternatively, if you prefer to write the code for accessing the API by yourself, you can retrieve the generated image using the Fetch API and create a file with Node.js's fs and Buffer modules.
const fs = require('node:fs');
const { Buffer } = require('node:buffer');

void async function() {
    try {
        response = await fetch('https://api.imagepig.com/outpaint', {
            method: 'POST',
            headers: {
                'Content-Type': 'application/json',
                'Api-Key': 'your-api-key'
            },
            body: JSON.stringify({"image_url": "https://imagepig.com/static/jane.jpeg", "prompt": "dress", "bottom": 500})
        });

        if (!response.ok) {
            throw new Error(`Response status: ${response.status}`);
        }

        json = await response.json();
        const buffer = Buffer.from(json.image_data, 'base64');

        fs.writeFile(
            'jane-in-a-dress.jpeg',
            buffer,
            (error) => {
                if (error) {
                    throw error;
                }
            }
        );
    } catch (error) {
        console.error(error);
    }
}();
For PHP, we provide a convenient imagepig package that you can use to easily access the API.
First, install it using the composer dependency manager:
composer require doubleplus/imagepigThen, use this package to call the API:
<?php

$imagepig = ImagePig\ImagePig('your-api-key');
$result = $imagepig->outpaint('https://imagepig.com/static/jane.jpeg', 0, 0, 500);
$result->save('jane-in-a-dress.jpeg');
And that is all you need to do. Only the opening tag and three lines of code!
Alternatively, if you prefer to write the code for accessing the API by yourself, you can use the cURL library to get the generated image from Image Pig.
<?php

$ch = curl_init('https://api.imagepig.com/outpaint');

curl_setopt($ch, CURLOPT_HTTPHEADER, [
    'Content-Type: application/json',
    'Api-Key: your-api-key',
]);
curl_setopt($ch, CURLOPT_RETURNTRANSFER, true);

curl_setopt($ch, CURLOPT_POST, true);
curl_setopt($ch, CURLOPT_POSTFIELDS, json_encode([
    'image_url' => 'https://imagepig.com/static/jane.jpeg',
    'prompt' => 'dress',
    'bottom' => 500,
]));

$response = curl_exec($ch);

if (curl_errno($ch)) {
    exit('Error: ' . curl_error($ch));
}

$handle = fopen('jane-in-a-dress.jpeg', 'wb');
fwrite($handle, base64_decode(json_decode($response, true)['image_data']));
fclose($handle);
For Rust, we provide a convenient imagepig crate that you can use to easily access the API.
First, install it using the cargo package manager:
cargo add imagepigFor this particular example, you will also need to install tokio be able to run asynchronous code inside the main function:
cargo add tokio -F rt-multi-thread -F macrosThen, use the installed imagepig crate to call the API:
use imagepig::ImagePig;

#[tokio::main]
async fn main() -> Result<(), imagepig::ImagePigError> {
    let imagepig = ImagePig::new("your-api-key".to_string(), None);
    let result = imagepig.outpaint("https://imagepig.com/static/jane.jpeg", None, None, Some(500), None, None, None).await.unwrap();
    result.save("jane-in-a-dress.jpeg").await?;

    Ok(())
}
And that is all you need to do.
To implement the API access by yourself, you need to install some dependencies using cargo first:
cargo add base64
cargo add reqwest -F json
cargo add serde -F derive
cargo add tokio -F rt-multi-thread -F macros
Then, you are able to run it using the cargo run command.
use base64::Engine;

#[derive(serde::Deserialize)]
struct ImagePigResponse {
    image_data: String,
}

#[tokio::main]
async fn main() -> Result<(), Box<dyn std::error::Error>> {
    let client = reqwest::Client::new();
    let response = client.post("https://api.imagepig.com/outpaint")
        .header("Content-Type", "application/json")
        .header("Api-Key", "your-api-key")
        .body(r#"{"image_url": "https://imagepig.com/static/jane.jpeg", "prompt": "dress", "bottom": 500}"#)
        .send()
        .await?;

    response.error_for_status_ref()?;

    let json = response.json::<ImagePigResponse>().await?;
    let content = base64::prelude::BASE64_STANDARD.decode(json.image_data)?;

    std::fs::write("jane-in-a-dress.jpeg", content).unwrap();

    Ok(())
}
Anyway, the code will write the resulting image a to a file named jane-in-a-dress.jpeg, which looks like this:

And here she is, in a beautiful dress.
Try it out!
You need to have an API key to use this functionality. Create your Image Pig account or log in.
Do you miss any functionality? Did you get lost in our reference? Or something does not work as expected? Contact us and our AI image effect specialist will help you to implement a solution according to your needs.